Sunshine quilt

Sunshine quilt

Sunday, 26 January 2014

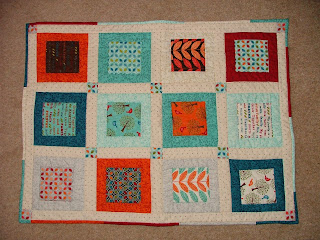
My first quilt from my own design

 I have finally found time and confidence to design a quilt from scratch. It has been in my head for some time and the idea came together from two lovely and quite different fabric collections I acquired. One was a gift and the other was a purchase I couldn't resist.

It's not finished, but I have done enough to show you and see what you think.

Ooops - sorry about bag waiting to go to compost heap underneath!


There is still room for improvement in my photography (and it was a very windy day but I was desperate for outdoor light) but I hope you can get an idea of what it looks like. I bought five half meters of Sakura Park fabric from Moda and framed 5.5 inch squares of it with strips from a pre-cut Bali Pops Breakers.

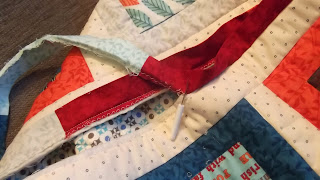
Here is a close up.

I'm really pleased with how it has turned out so far. Since these pictures I have put on a 6 inch border in blue batik fabric and am just working on a pieced border of 2.5 inch squares alternating between plain blue and the patterned fabric

I am enjoying the designing so much I shall definitely try designing again. I am wondering how to quilt this - perhaps something grid like to go with the very square style pattern - or something more free motion? It's only a relatively small quilt so either would be possible. I'd love to hear you suggestions.


Monday, 20 January 2014

Colour continued


Last year I finished the Southampton Blanket. This was my ongoing and relatively undemanding crafty thing that came with me every time I packed up my little suitcase and my car and headed off to the Premier Inn at Southampton for work. That blanket is now finished and lives on my bed and a new blanket is in progress. Just as before this one comes with me on my travels to while away time in hotel rooms. My ideal project for this is that it is easy to pick up and put down and doesn't require a lot of concentration to do. The pattern for this blanket caught my attention on the Stitches Galore blog. It's a perfect project for my travels. It uses beautiful Shetland wool from Jamieson's and you simply work your way through the shade card. Totally relaxing as someone else has made the colour choices for you! I also have to work s-l-o-w-l-y with this project as the wool is expensive so I can only afford to buy a batch every now and then. At the moment I'm just moving from browns to yellows.

This is a real education to me as none of these are my colours of choice - blues, reds, purples and greens are far more my thing. However I am pleasantly surprised by how much I like these colours and also how they are affected by what is next to them.

The blanket I am making is for a double bed. The width is no problem as the pattern is easy and very repetitive. It's all made up of treble crochet with regular decreases and increases to form the chevron pattern. I think the pattern is in The Gentle Art of Knitting by Jane Brocket. On the Stitches Galore blog there is also a blanket done in a ripple crochet pattern, the pattern for which can be found on the Attic 24 blog.


There is nothing very creative about my blanket - but it is pure crafty relaxation. All my creative energies are going into a quilt I'm designing and making - which is still quite a new thing for me ... more of that soon.

Thursday, 16 January 2014

My crafty haven!

I wanted to show you where I make my quilts and do most of my sewing. I am very lucky in that since last summer I have had a dedicated room to sew in. This seems to have made a huge difference to how much sewing I do and also how much enjoyment I have got from it. We live in an old Victorian house in a small rural village. The house is a former saddlery shop and my office for my day job is in the shop. When we moved in we had a room across the two garages ( one was a former stable and one the 'garage' for the coach).


 You can see the window of the upstairs room quite clearly in this picture. The room had originally been used for storing hay for the horses living below. It was accessed by a ladder and for the first six or so years we lived here we just used it to store junk. But eventually last year we found time and money to start to make it into a usable craft room. First came the metal staircase

This was a big undertaking as it had to be designed, planned and fabricated and then fitted. After that the roof had to be done and four skylight windows which were just panes of glass replaced with proper Velux windows. The the inside had to be fitted out. But finally last year it was done.


This is the view towards the door.

And this is the view towards the back. Can you see that pesky quilt on the ironing board!
I share it with my husband's train set which you can't see - but I have to say I seem to have most of the space!

I know I am really lucky to have a room like this - it's made such a difference having somewhere to store my stuff and a peaceful place away from the house to sew and knit. It's a bit chilly just now - but wonderful in the summer.

Monday, 13 January 2014

Quilting frustrations


You may remember that making progress on this quilt was my new year target which I mentioned here. Well I have made a little bit of progress but this quilt is driving me NUTS! I know - it's a bit pathetic to get annoyed about a hobby that is supposed to be pleasurable ...but .....

I've finished piecing the top. I was a bit limited for size as I wanted it for a king size double but I had to limit the amount of fabric to keep the cost within reasonable parameters. It's 11 x 8 8.5 inch squares which makes it 94 ish by 68 inches. This is fine as it is the full width of the bed but comes just below the pillows. I now need to quilt it but I am not sure it will go through the throat of my machine which isn't huge. I've re-watched my Craftsy class (Quilting Big Quilts on a Small Machine) and worked out that if I want to grid quilt it then splitting the wadding into three is a bit of a non-starter. What to do?


I think I am going to make the sandwich and try and get it through my machine. If this doesn't work I will hand quilt it - which I don't mind doing but it means it won't get finished for a lot longer.

It's been trouble from the start! I started it a long time ago when I was really a beginner and quite a lot of it has been unpicked and put back together. I am determined to see it through though. I've had trouble tracking down enough of the backing fabric I've chosen - Philip Jacobs Picotte Poppies in ochre but an email has just come through from Glorious Color to say they have 6 yards. It seems that everything I try with this quilt is unstraighforward ( not a word - I know).

Hey ho! I really hope it is worth it in the end!

Thursday, 9 January 2014

Sashiko cushions


I had never heard of Sashiko until about a year ago when I came across it in The Gentle Art of Stitching.
It's a Japanese craft and involves stitching in quite thick thread in running stitch on a linen type fabric. I bought the indigo patterned fabric as a pre-printed square with the lines for you to stitch on already marked. You use sashiko thread which is a  heavy cotton and is used double in a sharp and fairly large needle. If you like hand-sewing this is the ultimate relaxation. This was my very first attempt and although the stitching is not very neat I still think it looks really effective. I sat in the garden last summer and did this. I didn't use a frame and I suppose that is why the fabric looks a bit wrinkly - but I like the kind of homespun effect of this.

This is my second attempt here


Once I had finished the sashiko stitching I just added a border in some Kaffe Fassett shot cotton and then made a quilt sandwich with wadding and a bit of curtain lining. I then hand quilted the stripes on the border with some embroidery thread. To  finish I added a back to the cushion cover also in shot cotton.

I ordered all my Sashiko supplies from the excellent Euro Japan Links. The kits are not expensive and I think would make a lovely gift for someone who likes to sew. I then bought a book to find out more about sashiko. This was The Ultimate Sashiko Sourcebook by Susan Briscoe. It's a lovely and fascinating book to read and also has some really nice patterns for more advanced sashiko. I haven't got beyond the kits yet but I am sure I will one day. I notice Susan has a blog too, here. So if you fancy something stitchy that's easy and relaxing then I would definitely give it a try. Talking of which I need some relaxing craft at the moment. My new year project (yellow/orange/brown half log cabin quilt - see here) is giving me big headaches. More of that soon :(

Monday, 6 January 2014

Being thrifty


This is my first attempt at an improv sampler from Lucie Summer's book Quilt Improv. You may remember the other one I made for a Christmas gift  here. I loved making this one as I just rifled through all my scraps and put them in any old way (well not quite any old way - but without worrying too much). My most favourite bit is where I trimmed a bit off the square made of purples and yellows and then was able to use the trimming as well. Can you see?

Using up my scraps made me think of being thrifty and wonder just a little bit at the irony of lusting after beautiful new (and usually pretty expensive) fabrics to do a craft that was originally the height of thriftiness. I did wonder about using scraps from old clothes to make a quilt but when I looked at what I might have in my wardrobe so many of the fabrics are made from different materials - even some of the cottons have elastane in them to help them hold their shape or be minimal iron and I don't think it would work to mix different types of fabric.

However I did think of a thrifty tip the other day. I remembered I had a load of trimmings from the spare few inches on the edge after I had quilted a fairly large quilt.


You can see them here still attached ( 505 spray baste) to the wadding. I'm going to peel them off and trim them down into quilt binding. There will definitely be enough for a small quilt. In the interests of thrift I'm also going to try and make some blocks just using my small scraps and see how they turn out. Isn't this one lovely from the root collection?

And now I'm just smiling to myself - as a person of a certain age, I was brought up by parents who lived through the second world war. For as long as I can remember my dad used to stick the old bar of soap to the new one so not a scrap was wasted. He even used to cut old bed sheets in half and re-sew them sides to middle! Now there's thrift for you!

I'd love to know any of your thrifty tips for quilting!


Saturday, 4 January 2014

Baby quilt and a short tale of unpicking!


This is a quilted baby mat which I made over Christmas. It's a present for one of my daughter's friends. The design is my own and it makes full use of a layer cake of Deb Strain's Family Tree fabrics.


 I put together the top on Boxing Day and it was very easy to do. I sandwiched it with two layers of wadding so that it was nice and thick and then quilted it on the machine. So far, so good. I made some straight binding for the edges out of the fabric left from the outside of the squares and machined it on. I had a go at the method described in the Red Pepper Quilts binding tutorial for machine binding which I found really easy to follow but decided against this for this quilt as the different colours of the binding meant my (not very accurate) stitching was very obvious. I will definitely give this method another go. Then I sat down in the evening to hand stitch the binding. Just as I had got to the final side of hand sewing I realised that I hadn't caught a couple of small sections of the edge of the quilt under the binding.

I checked it over and decided I could re-machine it in the places where I had missed the next day. Then I went to bed and thought about it ..... Have you ever made something where there is a mistake and left it and even though only you know it is there it gets on your nerves? I can remember doing this with a knitted jumper and avoiding wearing it because my eyes were drawn to the mistake. So the next morning it was out with the stitch ripper and all the binding came off.


It took about 45 minutes to unpick but I know it was the right thing to do. I forced myself to go slowly so as not to damage the quilt top and I rescued all the binding to re-use. The next picture is me at the ironing board picking all the little bits of cotton off with sellotape before ironing the binding. Grrrr!


You'll be pleased to know it all went back on fine and definitely reinforced the lesson for me that if you have made a mistake that is going to get on your nerves it's better to re-do it than spend lots of time fretting about covering it up. Is that a moral for life I wonder??!